Master Bathroom DIY Tiled Floor Progress (Plus, The Best & Worst Tile Leveling Systems)
*This post contains affiliate links.
I’m slowly but surely making progress on the tiled floor in the bathroom. I’m using Kolassus White 12″ x 24″ Matte Porcelain tiles from Home Depot. This is my first time ever to tile a floor with large format tiles, and it’s not the easiest thing I’ve ever done. 😀 I’m definitely getting better and faster as I move along, but I’d still rather tile a wall with small tiles any day of the week.
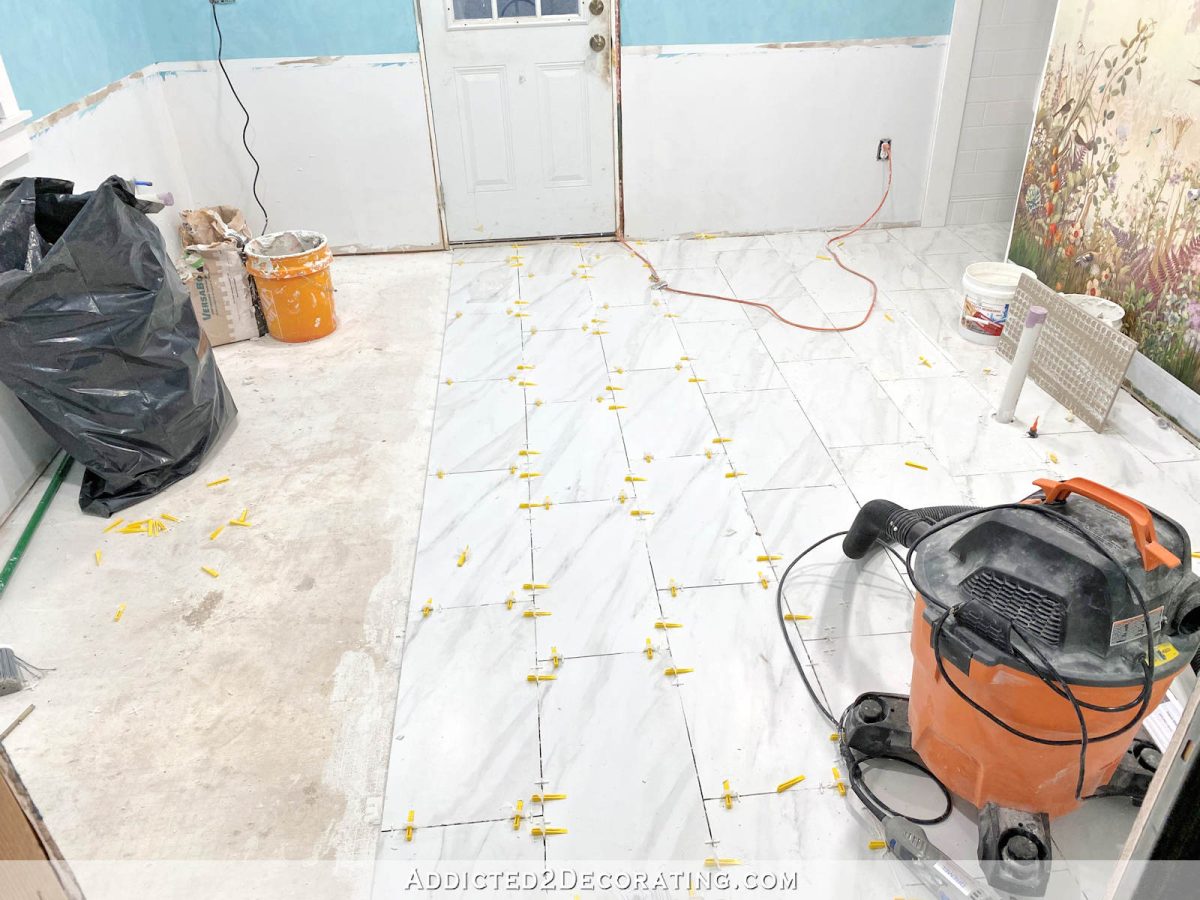
But I estimate that I have about four rows to go, which means I’m 2/3 of the way done with the tile installation. Then I’ll have a lot of clean up to do, and then I’ll grout. Here’s the progress so far….
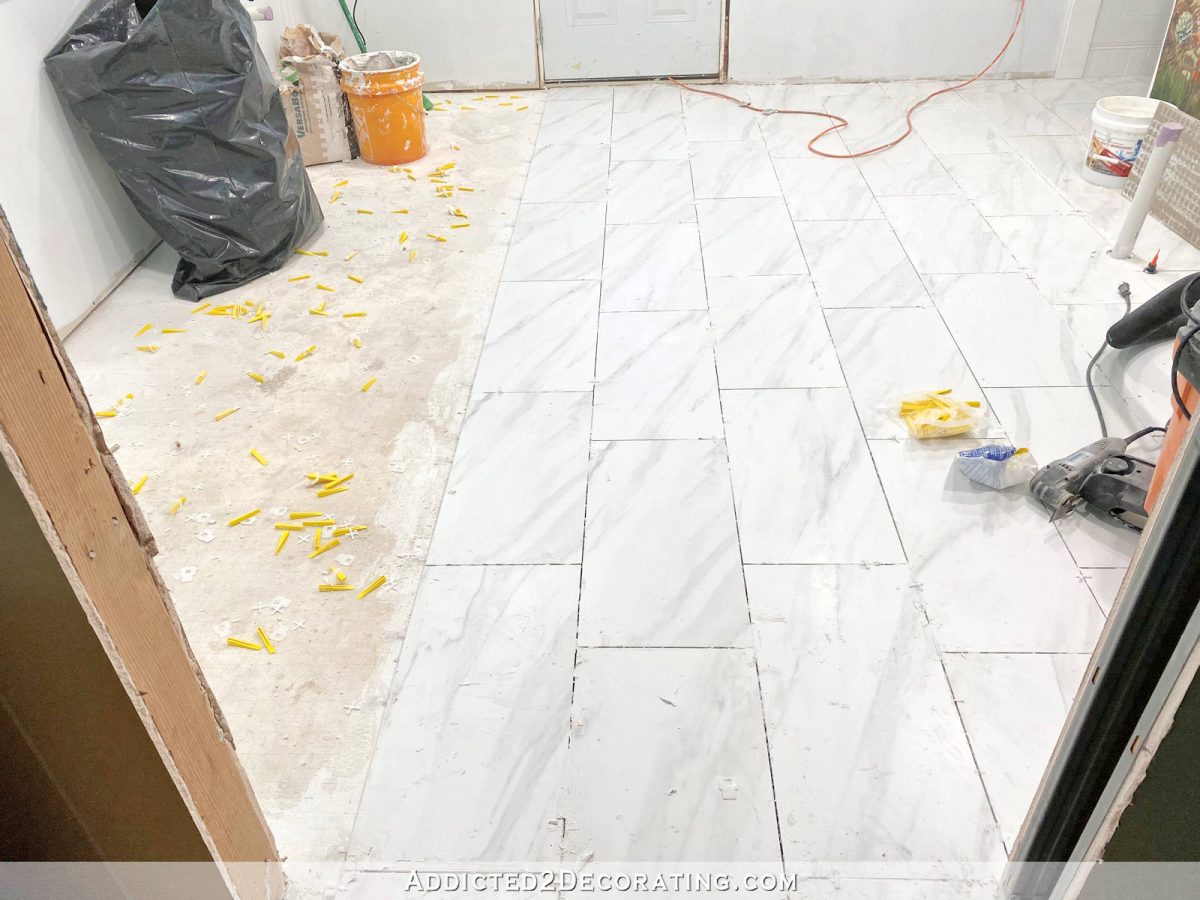
I’ve used two different tile floor leveling systems on this floor. If you plan on tiling a floor with regular-sized tiles (i.e., not mosaic tiles), you’ll want to use a tile leveling system. As the name would suggest, the purpose of these tile leveling systems is to make sure that each tile is level with the tiles around it so that you don’t end up with an edge of a tile sticking up higher than the tiles around it.
But for every great tile leveling product out there, there are horrible ones as well. Unfortunately, the first one I used was an awful product design, so I wanted to share my thoughts so that none of you will waste your money on it. The second one I used is an amazing and easy-to-use product.
So here’s the first one I used. I don’t even know the name of this product, but I got sucked into this by a slick video on a Facebook ad that made these look so easy to use. It has metal prongs that are supposed to go under the tiles and hold in place while you screw that black piece down until it’s tight on top of the tiles, leveling the tiles with each other.

First of all, look how ridiculously short those prongs are. If it shifts at all (which it will do as you twist that black piece), it won’t hold under the tile. And speaking of shifting, whoever thought it was a good idea to create a product that twists as it tightens on top of the tiles (tiles that are easily moved because they’re sitting on fresh, wet mortar) is a horrible product designer. Once the black piece put any pressure at all on the tiles, the twisting motion would shift the tiles out of place. Also, if any mortar got into the threads at all (which is almost guaranteed to happen if you’re a DIYer and not a professional), the gritty sand in the mortar made the black piece very difficult to turn.
It’s just a junk product from beginning to end. So if you see the ad for that on Facebook that makes them look so easy to use, ignore it and move on. There were so many glowing comments on the ad, but I suspect those were all from fake accounts created just for the purpose of leaving glowing product reviews. So this one is junk. Don’t get tricked.
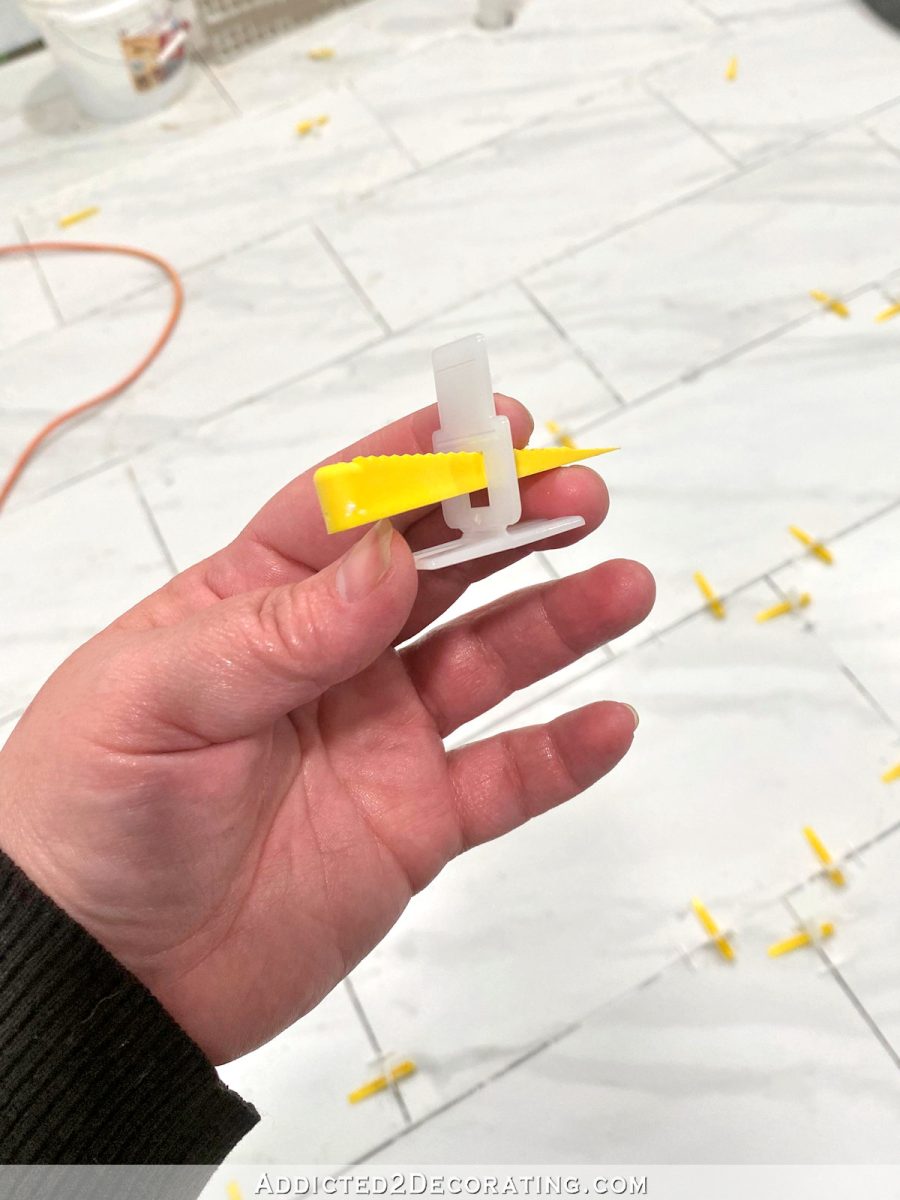
What you need is probably sitting in a bin at your local Home Depot store. This amazing tile leveling system is the QEP LASH Tile Leveling System. This is a two-part system that consists of the white plastic pieces that have the feet that go underneath the tiles, with a plastic piece that sticks up between the tiles. And if you want 1/16″ grout lines, these can also act as your spacers. (I wanted 1/8″ grout lines, so I used separate spacers.)

The piece that sticks up between the tiles has a square hole in it…

And once you have your tiles in place, you push this yellow wedge through the square hole, and the flat bottom of the wedge tightens down on top of the tiles and levels them with each other.
So after you’ve made some progress, you’ll have a bunch of yellow wedges being held down by the plastic pieces that are sticking up between the tiles.

And you just leave them like that for about 24 hours until the mortar has set.

I’m pretty slow at installing these large tiles, so I’m getting about three rows done at a time. But I’m determined to see it to the end!
Anyway, once the mortar is dry (about 24 hours, generally), you come back and give a little kick to the vertical plastic pieces that are sticking up between the tiles ((that’s not a euphemism, you literally just kick them with your foot), and they break off, leaving the little plastic feet under the tiles, never to be seen again. Then you’re left with tiles that are perfectly level with each other, and you can move on to clean up and grout.
The little yellow wedges are reusable. And the white pieces (which are not reusable because you’re literally breaking them into two parts once the mortar is dry) can be purchased separately on Amazon.
I think I have two more days of work ahead of me to get the rest of the tiles installed. I only have four rows left, but since the last four rows are past the doors (in other words, I don’t have the ease of starting on a far wall and working my way out the door), I think I can only do two rows at a time. So I’ll have to do two rows, let those dry overnight, and then do the last two rows. So if things go according to plan, all of the floors in this bathroom should be finished by the end of this weekend. That will be a huge accomplishment!
My favorite thing about this floor is the way that the large tiles flow right into the small shower floor tiles. I can’t wait to see this grouted!


Addicted 2 Decorating is where I share my DIY and decorating journey as I remodel and decorate the 1948 fixer upper that my husband, Matt, and I bought in 2013. Matt has M.S. and is unable to do physical work, so I do the majority of the work on the house by myself. You can learn more about me here.


That leveling system works OK, but if you truly want a perfectly level floor, use The Spin Doctor Tile Leveling System. I’ve laid over sized slate, granite, and ceramic and these don’t make your fingers sore and they level a much larger surface area with consistency. It’s an amazing system for the DIYer. They even work great for walls!
Your work is beautiful and I admire your persistence in getting everything just right!
It looks beautiful already — not even finished and not grouted. So high end.
I tiled two baths, a laundry room, and a kitchen with larger tiles (not quite as large as yours) using the little wedge levelers. They are great, but sometimes they didn’t quite break correctly and some plastic would be sticking up in the grout line. It was a bit more work going through and cutting those off here and there, but worth it to get a level floor. You have a good plan to just do a couple of rows a day. It is a lot of work and it’s better to do it when you are fresh and not just trying to get it all done quickly. Some of my grout lines are larger than others when I was rushing at the end (to be fair, I was working on it nights after work and trying to get rooms back in use quickly). No reason to rush this for you.
It’s been easily a decade since I tiled a floor (not something I enjoyed) but I somehow lucked onto the system you said is superior. I don’t know if it was made by the same company or not but precisely the same system with the wedge and the plastic part that stayed below in the end. I’m glad I didn’t fall prey to something that didn’t work as well. Happy accident!
Enjoying watching this far more than doing it! It’s amazing to see what you started with and where you are now.
You Go Girl ! I can feel the momentum building !!!
Have you guys used the shower yet? I waiting to hear how glorious that first shower is!
So many of your DIY adventures have inspired me to try things on my own…tiling is not one of them though. You have inspired me to avoid tile or be prepared to hire it out. 🙂 Which is good to know too! It just looks awful to deal with and so easy to mess up. Good luck getting the floor finished and everything grouted! Soon you’ll be able to focus on things more enjoyable for you!
It’s looking gorgeous, Kristi! Slow and steady, right? You are almost there!! xo
Tiling a floor is back breaking work, and I feel your pain in wanting to be done with it! I laid 8×8 tiles in our first kitchen back in the 80’s. They were hard enough, especially towards the end. Seems like those tiles gain a half pound with each one laid! Can’t imagine these whoppers you are working with, and I’m glad I’m too old for all this DIY now. Looks like the same tile we have in our primary bathroom. They can be slippery when wet, so be careful, but I love the feel and look of them.
It’s looking good! Thanks for the info on how to space and level tiles. I had my bath remodeled last year and the carpenter used something like that.
About your lovely floor tiles, I thought you used similar tiles like that in the hallway bathroom?
The tiles in the hallway bathroom are half the size of these — 6″ x 24″. Those were very easy to install.
You are amaaazzzing!
It’s looking beautiful! I can’t wait to see it completed!